Easy DIY Parabolic Microphone
DIY Parabolic Microphone? Just do it yourself!
I've always wanted to own a parabolic microphone to record content for our sound libraries. They’re the sonic equivalent to one of those bazooka-sized camera lenses, and the audio captured with them is truly stunning but.... then I wondered, with all the gear we have lying around, could I make a parabolic dish reflector myself?
So a few months ago I decided to go DIY and build one myself. It was a huge success, and I wanted to share with you guys how to make one quite easily.
What is a Parabolic Microphone?
A parabolic microphone is designed to capture sound from a distant source with a high degree of clarity. It uses a parabolic reflector to focus sound waves onto a receiver (microphone), much like how a satellite dish focuses radio waves onto an antenna. For example, a parabolic microphone is used on the sidelines of a sporting event to capture the impacts of say football player being tackled, or the sound of boxers in combat. This setup also allows for the recording of faint or distant sounds, making it perfect for extreme nature recording like volcanoes, or more civilized recordings of unique birds, and of course, enriching our sound libraries with unique audio content.
In this post I’ll explain step by step how it was assembled, and what you need to buy. Yep, you’ll still need to purchase some items - but it’ll cost you a lot less than even the cheapest commercial model.
Parabolic Dish Reflector: Differences and Contexts
While the terms "parabolic dish" and "parabolic dish reflector" are often used interchangeably, there is a subtle difference. The parabolic dish refers to the entire setup, including the microphone and the reflector, while the parabolic dish reflector specifically denotes the concave, reflective component.
The context of their usage can vary; a parabolic dish is ideal for field recordings, where capturing distant sounds with precision is crucial. In contrast, a parabolic dish reflector might be used in experimental setups or integrated into existing audio equipment to enhance its directional
And hey if you do build yours - we'd love to see/hear your comments about it! Sign up for our newsletter as we'll be talking about the parabolic there as well.
Right - Ready?? Let’s go!
Shopping List of a parabolic microphone
Wildtronics parabola - Feather Light - 125$
First, you need the actual parabola. This is the most important part to get, and obviously it’ll be a big part of the budget. But good news - Wildtronics offers the option to buy their parabolic dishes bare-bone, without any other gear or electronics. It’s basically a big salad bowl with a hole in the center. They have three models:
- Standard - Clear Polycarbonate (1.5 mm thick)
- Feather Light - Clear Polycarbonate (.76 mm thick)
- Black Ops - Black ABS (1.5 or .76 mm thick)
I’ve selected the feather light version.
Clippy XLR EM172 - 65$
Second, you need the microphone. I decided to use the Clippy XLR EM172 for this task. Like the name suggests, it comes with a clip which will be super handy later in the project.
But really, this microphone is one of the best options for someone who wants good sound with a low noise floor, on a budget. These microphones are simply amazing. You might even consider buying the matched pair, for what it costs. A lot of professional field recordists have a pair of these in their tool box.
(2X) LANIAKEA Studio Micro Table Stand with Mic Clip - 15$ each.
You could select a similar one, but the base needs to be made of plastic, and it needs to be about the same size. Basically the base needs to be slightly larger than the whole of the parabola. Both bases will be use to squeeze the parabola, so the whole setup can hold together firm.
Camvate 5/8-Inch Male to 1/4-Inch Female Mic Screw Adapter - 7$
This adapter is needed to fit the portable folding mini tripod (next item) in place in the whole of one of the Micro Table Stand.
Viltrox Portable Folding Mini Tripod - 10$
This will used as the parabola handles. With the help of the above adapter, you’ll be able to screw it into the Studio Micro Table Stand base, which holds the parabola.
Assembling...


Once you got all the gear together, the assembly is quite simple actually.
- First, unpack the two LANIAKEA Micro Table Stand. Take the two plates and put them aside.
- Now each box contains an extensible tube to screw on its plate. This tube is telescopic and is actually made out of two smaller tubes. Separate them and keep the smallest one. Put it aside as well.
- Inside the mic holder, there’s a plastic adaptor. Unscrew it from the mic holder and screw it in one of the base.
- Take the other base and screw in the Camvate 5/8 to 1/4 adaptor.
- Now that your plates are ready, firmly attach them together and drill 3 small wholes through them so you can bolt them together.
- You can now use the two plates to squeeze the parabola in place. Bolt them together and it won’t move. Make sure that the Camvate adaptor is on the plate that’s outside the parabola.
- Screw the Viltron Mini Tripod in the Camvate adaptor and you suddenly have a nice handle.
Take the smallest metal tube you’ve put aside earlier and screw it in the other plate. This will be the perfect holder for the Clippy microphone.
Final Words

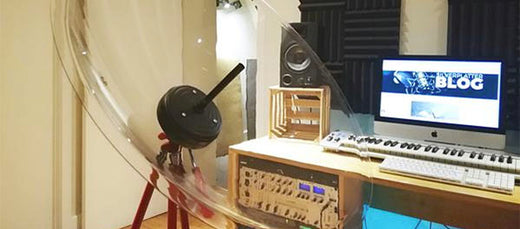
So this is how I made my first parabolic microphone! Our very own DIY listening device. Now, like all things it can be improved of course. I'd like to find a way to get the wire that comes out of the microphone out of the way; probably by drilling a small hole in the parabola, just outside of the plates.
On windy days, I used the small Rycote wind jammer I bought with the Clippy Microphone. It works well (but has its limits in more severe conditions).
Other than that, I've used it a lot this spring and frankly it sounds verrrry good. Thanks for reading, and have fun building your own parabolic mic!
Are you also a fan of binaural microphones? Check out our analysis of a neat pair of binaural mics, or our comparative review of the Roland CS-10EM vs Sennheiser Ambeo in-ear binaural mics!
-Phil
I'm co-founder of SilverPlatter Audio. We provide micro sound effects packs for sound designers, film editors and music producers.
![]()