Easy DIY Creak Box

Step-by-Step Guide to Building Your Own Creak Box
As a sound designer or a sound editor, these sounds are probably among the most common you’ll need to create or edit. Whether you call them creaks, squeaks, or cracks, these sounds are essential to bring life and texture to a project. Sure, there are some excellent sound libraries that cover the basics, but sometimes, you need something more unique, more personal. Wouldn’t it be great to perform and "play" these creaks as if they were coming from a musical instrument, tailor-made for your specific needs?
Well, such an instrument exists, and it’s called a creak box. In this post, we’re going to show you how to make one yourself. The best part? It’s super easy to build, and you don’t need to follow the instructions to the letter. Feel free to customize it—make it smaller, bigger, wider, use different materials or types of rope, and it will produce a sound that’s uniquely yours. I’m confident that no two creak boxes in the world sound exactly the same!
So, what exactly is a creak box? And more importantly, how is it made?
A creak box begins with a sturdy wooden frame. The frame needs to be strong enough to withstand significant pressure because altering the pressure will change the sound of your creak box—sometimes drastically. This variability is what makes the creak box such a versatile tool.

Building the Perfect Wooden Creak Box Base
Lucky me, I had an old piece of wood in my garage that was perfect for this task! With a drill and some screws, you'll have this part done in (almost) no time.
Next, you’ll need to drill two holes in the center of the frame, side by side. These holes should be slightly larger than the diameter of a drum stick (not the food, the stick used to bash a drum!), a couple of centimetres lets say. Don’t worry if this doesn’t make sense yet—everything will come together shortly.

Preparing Your Creak Box Frame
On the opposite side of the frame bottom, you’ll need to drill another hole, but this one should be smaller in diameter, just wide enough to fit a sturdy screw with an eye bolt end. Once the hole is drilled, insert the screw and start turning it. It should fit snugly, requiring some effort to rotate, which is exactly what you want.

Crafting the Creak Mechanism
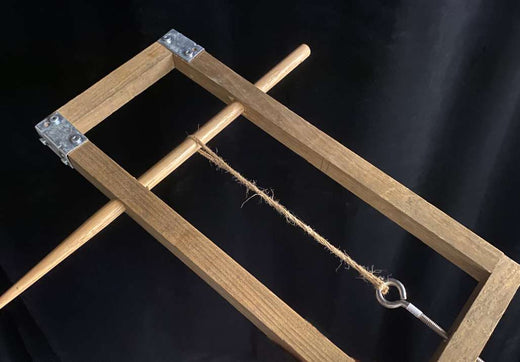
Now we’re getting to the fun part! Take your drum stick and insert it into the two holes you drilled earlier. Because the holes are slightly larger, the drumstick will have a tendency to fall, which is entirely normal. To keep it in place, tie a tight loop of rope between the drumstick and the eye bolt. It should look something like this:

And there you have it—your very own creak box! To use it, turn the eye bolt clockwise to tighten the rope. Then, rotate the drumstick. As the drumstick turns, it will create creaks, allowing you to perform and control the sound, making you the master of creaks, squeaks, and cracks!
Before you dive into your new creak-making adventures, here’s an important note: the type of rope you use can significantly impact the sound of your creak box. I experimented with several before finding the one that produced my favourite sound. Also, be mindful of the tension you apply with the eye bolt. While increasing the tension can lead to more dramatic creaks, overdoing it could break your new toy—or worse, cause injury. Always use gloves and eye protection when operating your creak box to stay safe.
You're curious to hear how it sounds? This creakbox was used (among other techniques) to record sounds on our Wood and Metal Creaks library. Go check out the demo to hear the result!
Happy recording, and if you do your own creakbox we'd love to hear from you, and hey also if you come up with some unique twist (no pun intended) on the creak box let us know!
-Phil
I'm a co-founder of SilverPlatter Audio. We provide sound effects packs for sound designers, film editors and music producers.


